Northern Lights
What are they?
Northern lights, or Aurora Borealis, is a natural phenomenon caused by high-speed electrically charged particles bombarding Earth’s atmosphere. As a result of this bombardment the oxygen and nitrogen atoms in the atmosphere emit light which we then see as the aurora (a similar process happens in neon light tubes). The bombarding particles actually mainly originate all the way from the Sun. As a result of the Sun’s energy production there is a continuous flow of electric particles, or plasma, which we call the solar wind, flowing from the Sun into the interplanetary space and beyond. The solar wind carries, along with its plasma, the magnetic field of the Sun. As the solar wind reaches Earth, it encounters the magnetic shield that is formed by Earth’s magnetic field, deforming it by pushing it from the dayside and stretching it into a long tail on the night side. Under certain circumstances the solar wind then interacts with Earth’s magnetic field in a way that allows some particles to reach Earth’s atmosphere on the dayside polar regions, causing the so-called daytime aurora (these can be seen, for example, in Svalbard during winter when it is dark even during the daytime, even though they are not as strong as the nigh-time aurora). As the solar wind blows towards the tail of Earth’s magnetosphere, the resulting pressure in the tail can energize some particles and following Earth’s magnetic field back to the polar regions, they reach the atmosphere causing the usual night time aurora. The regions where the particles finally hit Earth’s atmosphere causing aurora are called the auroral ovals, located around the northern and southern geomagnetic poles. Although we currently have a good overall understanding of how the aurora are formed, some details still remain a mystery. For example, we actually do not quite know the details of what happens in the interaction between the solar wind and Earth’s magnetic field, or what exactly takes place in the magnetic field’s tail region.
While the solar wind indeed flows continually, it also changes constantly. These ever-changing conditions of the space environment are collectively referred to by the term space weather. Very slow and steady solar wind does not usually cause aurora to form, but either high speed streams or types of shock fronts caused by solar eruptions are needed. When there is an eruption in the Sun, it will take roughly 1-3 days for it to reach Earth. The larger the disturbance in the solar wind (and the eruption in the Sun) is, the more it warps Earth’s magnetic field, causing the auroral ovals to expand, and the further south we can see the aurora. In this way the occurrence of aurora is closely tied to the level of solar activity. While there are constant changes in the level of solar activity, on a longer timescale the activity follows an 11-year cycle. Luckily this does not mean that the Aurora would completely disappear even during low solar activity, but we can still enjoying spectacular auroral displays even though we are close to the solar activity minimum. Solar eruptions large enough to cause aurora can happen any time!
 Depending on the disturbance in Earth’s magnetosphere, the auroras can be very faint or very bright, ranging from invisible to the human eye to even illuminating the ground below in shades of green. Most often auroras are seen as green bands in the sky familiar from most photographs of northern lights, but other colors appear also. Sometimes there is red above the green, and sometimes there is purplish red below the green. The different colors are a result of the energy absorption by different chemical elements of the atmosphere at different altitudes. The most common color green and the occasionally visible red above the green are both coming from oxygen atoms. The purplish color below the green, however, is coming from nitrogen molecules. Because the auroras occur quite high in the atmosphere, at roughly 100km, the same auroral display can be seen over a large area on ground. On the other hand, unfortunately, because they are above the clouds, one needs a cloudless sky to enjoy the show.
For more information on how to see the aurora please see the tab “How can I see the Northern Lights?”.
How can I see them?
While northern lights are not rare at all, many things must come together in order for us to see them: You have to be in the right place at the right time.
“Where can I see them?”

Northern lights can be seen in an area around the north geomagnetic pole called the auroral zone. This zone includes for example the northern parts of Fennoscandia, Iceland, parts of Greenland, northern Canada, and parts of Alaska. Northern Norway in particular is a popular place to travel to see the aurora since even in the north, the coastal regions have relatively mild winter temperatures. Here, however, the cloud cover can often become an obstacle for seeing the aurora and some people prefer to travel a bit inland to get away from the clouds, even though the colder temperatures require a bit warmer equipment.

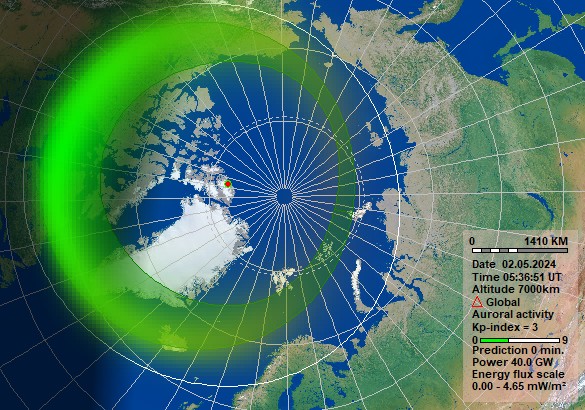
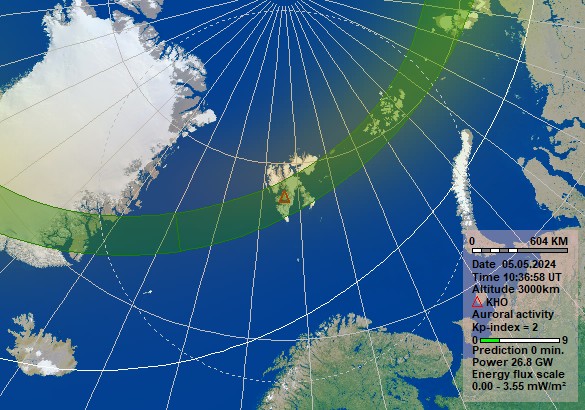
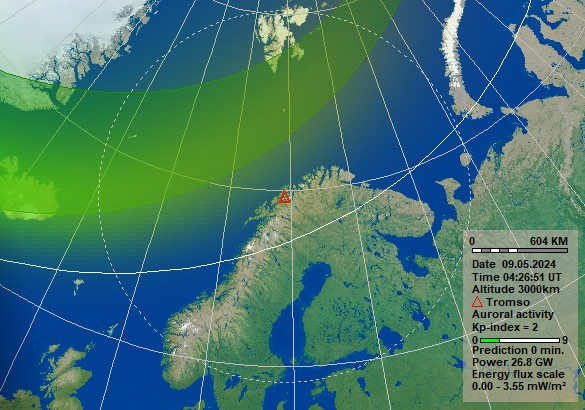
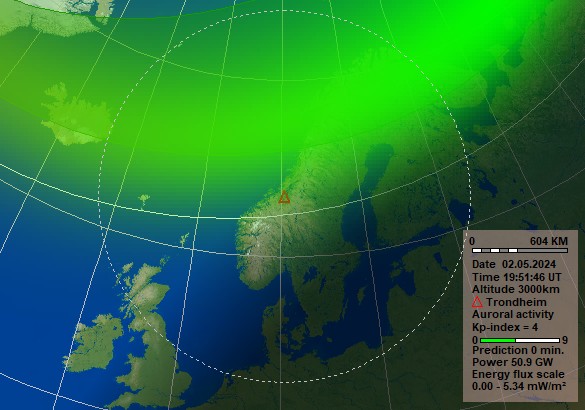
The region where the aurora occur in the north, i.e. the auroral oval, expands southwards as space weather conditions became stormier and geomagnetic activity increases, which means that aurora can be seen also further south. The so-called Kp index measures geomagnetic activity on a scale from 0 (low) to 9 (high). The map shows rough estimates of the southern border of the region in Europe where aurora can be seen during different Kp index levels. Estimates of the upcoming auroral oval position and the Kp index can be seen in the KHO auroral forecast. There is also a southern counterpart for the northern lights, but much fewer people there to see them since the southern auroral zone falls in the Antarctic and the surrounding ocean with no population. During times of high activity however, the aurora can sometimes be seen for example in New Zealand.
“When can I see them?”
While auroras occur throughout the year, the auroral zone lies far up in the North where the midnight Sun prevents us from seeing the aurora from around mid-April until the beginning of September. When planning for traveling to see the aurora, it might be a good idea to double check the rising and setting times of the Sun in the region you are planning to go to. Usually auroras can be seen best in the evening between 20:00-02:00, but it is not uncommon for them to appear outside this time window. The chart below shows an estimate of the best times for seeing the aurora in Tromsø, northern Norway. The red color shows times when it is generally too bright to see the aurora, while the yellow shows times when it should be dark enough but aurora are less common, and green is for when it is dark enough and aurora are more likely to occur. Statistically speaking there are some kind of auroras on every other night over Tromsø, but ranging from very faint to very bright.
 “How about the weather?”

Often the main obstacle for seeing the aurora is the weather, since the auroral light originates from far above the altitude where clouds are. Fortunately, the sky does not need to be completely cloudless in order to see the aurora, and sometimes it can even be an interesting addition to the view, especially when photographing the aurora. You can follow the local weather conditions from the Norwegian Meteorological Institutes weather service website.
“Are there some other things I should consider?”
Since any additional light sources can quickly outshine the aurora, one should venture away from cities or other places with strong light pollution. Additionally, it might be wise to consider the rising and setting times of the moon, especially during full moon, since it can often outshine the aurora.
“I am in Northern Norway on a cloudless January evening and it’s really cold. Do I have to stand out all evening not to miss out on the show?”
Fortunately, no. There are several things you can check online to see how likely it is that you will see some auroras. However, you might want to peep outside every now and then even if the websites show that there is nothing going on, just in case. In addition to the auroral forecast, there are several all-sky cameras available online (during the dark season) where you can actually see what is visible in the sky.
For more detailed information on the aurora, please see the tab “What are the Northern Lights / Aurora?”
Science
This page will give you more information on how you can use the contents of our website to your benefit, particularly if you want to go hunting for the aurora.
All-sky Cameras


If you can’t for some reason go out and see the sky to check if there are northern lights, All-sky Cameras are the next best thing! Our website currently features all-sky cameras from Skibotn and Andøya in northern Norway. In the pictures above you can see some examples of what northern lights can look like on the all-sky camera. The cameras are running when the Sun is more than 2 degrees below the horizon. In the figure on the right you can see the field-of-view of the cameras.
If you are wondering if you missed out on something the previous night, you can take a look at the “Keogram” tab, you can also see a compact summary of the past 24 hours of all-sky camera images.
In the “Solar and Lunar positions” tab you can see the elevation of the Sun and the Moon: if the elevation is above zero, it means that they are above the horizon. These can be helpful in determining when is the best time to go out, especially if you are not sure when the Sun will be setting.
Northern lights forecast
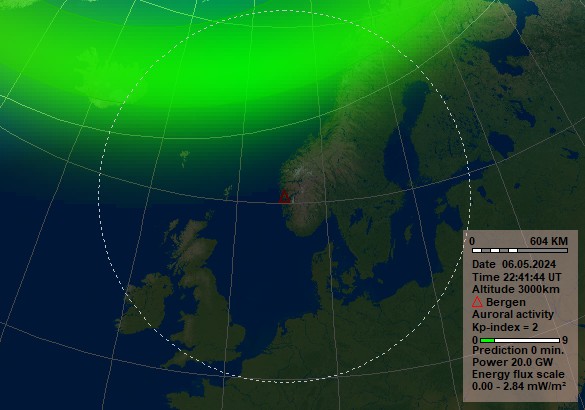
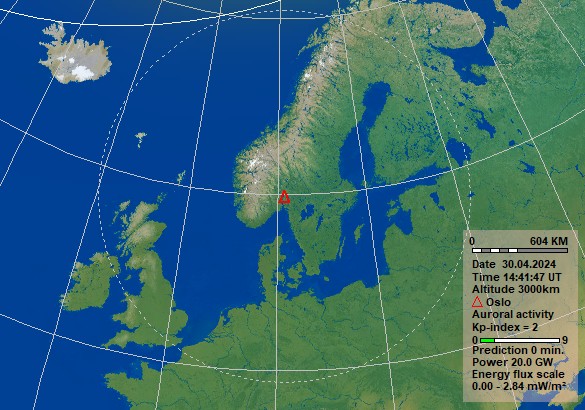
 On our pages you can find a northern lights nowcast and forecasts for the next 1 and 4 hours for several different locations. The images show the estimated auroral oval location and size, with the brightest part of the oval is also where you will most likely see aurora. The shadowed area is of course the nightside, where also the auroral oval is brighter. The forecast also estimates the Kp index, a global measure of geomagnetic activity, which affects the width of the auroral oval. The higher the index value is the further south the aurora can be seen.
Near real-time auroral electrojet tracker
If you want a more detailed estimate of the auroral oval location,  the auroral electrojet tracker shows estimates of the poleward (red dashed line) and the equatorward (green dashed line) boundaries over northern Europe, based on ground-level measurements of the Earth’s magnetic field. (You can find more technical details in the “information” tab.)
Geomagnetic time series

 One way we can see the effects of the same solar storms that results in the northern lights, is to look at the variations in Earth’s magnetic field. Even though there are constant changes in Earth’s magnetic field, in a large part of Norway the variations caused by space weather are larger and more rapid than the “normal” changes that occur during calmer times.
The “geomagnetic time series” plots shows measurements of earth’s magnetic field from several locations at the same time, for the past 24 hours. On the righthand side of the plots you can see the station acronyms, and if you look at the “map” tab, you can see where these stations are located (The stations are listed in order from north to south on the plot). In the example images you can see two different occasions: a very active period on the left and a quieter time on the right. The scale bar on the right hand side of the images for 200 nT gives you an indication of the level of activity from the plotting period.
The large, rapid changes in the plots (like the one seen inside the read circle) are evidence of the same processes going on that also is connected to the aurora.
Ground disturbance (deltaH)

 A good, quick way of seeing how large disturbances there are right now in the magnetic field, is looking at the map plot for the Ground disturbance (deltaH). The size of each circle shows the size of the disturbance at each measurement station in different locations in Norway, Sweden and Finland. The color scale changes over each time the picture is updated and is determined by the largest measured value on the map. You can see example plots above for an active time (right) and for a quiet time (left).
Geomagnetic activity indices
 If you want to see how the level of geomagnetic activity has been in the past, you can look at the “geomagnetic activity indices” plot which shows the range of geomagnetic disturbances for the past month in several locations in Norway, Finland and Sweden. In the “Interactive Plots” tab you can select other periods of time or stations, or look at the numerical data.
Ground disturbance dH/dt and dB/dt 30min Forecast

 When we look at geomagnetic activity, in addition to the strength of the disturbances in the magnetic field, it is also important to measure how rapid the variations are. In the plot “Ground disturbance dH/dt” you can see rate of change nowcast in the magnetic field at different locations in Norway, Finland and Sweden. The size of each circle shows the rate of change at each measurement station. The color scale changes with each update, and is determined by the largest measured value on the map. You can see example plots above for an active time (left) and for a quieter time (right).
 With the help of solar wind data, the “dB/dt 30min Forecast” shows an estimate of the ground disturbance for the next 30 minutes. Note that the forecast is showing the disturbance in nT/min, whereas the nowcast is in nT/s.
Geomagnetic summary
 The “geomagnetic summary” gives a quick estimate of the level of geomagnetic activity for the past 24 hours, and gives a forecast for the next hour for Tromsø and Dombås, which can be thought to be roughly representative of northern and southern Norway. The summary has three classifications for geomagnetic conditions: Quiet, Moderate and Active. If you want more detailed information on how these levels are defined, you can look at the “Information” tab.
Global geomagnetic activity (Kp) and Kp-index forecast
 The global level of geomagnetic activity is measured with a 3-hourly index “Kp”, ranging from 0 (quiet) to 9 (extreme). Unlike the geomagnetic activity index deltaH, the Kp index has a quasi-logarithmic scale, meaning that the difference in the disturbance level between Kp 0 and Kp 1 is not the same as between Kp 8 and Kp 9. On average, a Kp level of 8 is reached 100 times per solar cycle of ~11 years, and a Kp 9 only 4 times per cycle. In the example figure you can see a very active period from 2003. The Kp forecast page shows an estimate of the Kp index for the next hour.
Solar wind


The driving force behind geomagnetic activity, and the Aurora, is the solar wind. We get information about solar wind through satellites that are located between the Earth and the Sun. This way, we will know what’s coming with an advance warning ranging from 30 minutes to a couple of hours. There are two main features that you want to be on the lookout for: The magnetic field (BZ) and the speed (V).
Generally speaking, high solar wind speed (more than roughly 450 km/s) and a large, sustained negative BZ are good if you want to see the aurora, but these are by no means necessary for the aurora to occur.
The plots for solar wind conditions on our website show the solar wind magnetic field, speed and density. Above you will find three examples of solar wind data (note that the plots use different colours than the ones on our website). In the left image you can see a case where a Coronal Mass Ejection (CME) has reached the satellite, and usually results in active space weather conditions, and great aurora. On the image in the middle, you can see the arrival of a high speed stream, which also give rise to disturbed conditions and aurora, but often a bit weaker storms than what the CMEs cause. The image on the right shows how the solar wind looks like in quiet conditions (note the very different scales compared to the other images!).
The Sun


The solar wind is of course produced by the Sun. By looking at the details we can see on the solar surface, we can estimate what the solar wind and thus the geomagnetic conditions will be like in a few days. While you cannot directly see the two main drivers of disturbed conditions, CMEs and high-speed streams, on the solar images, the source phenomena can indeed be often recognized. The main driver for CMEs are strong flare eruptions on the Sun. An example of a flare occurring can be seen in the image above (left). Flares usually occur in areas of so-called active regions which can be seen as sunspots like in the image in the middle. The high-speed streams originate from so-called coronal holes, which can be seen as dark regions like in the image on the right.
Ap 27-day forecast
 The Ap index measures the general level of geomagnetic activity on the global scale on a daily basis. The forecast shows an estimate of the Ap index for the next 27 days, thus giving an indication of the geomagnetic activity level to come. The forecast should be considered with some caution, however; It functions fine during times of low solar activity, when most of the geomagnetic activity arises due to recurring coronal holes, but fails to perform well in times of higher solar activity.
Front page
 On our front page you can find a quick overview of the space weather conditions:
You can see the geomagnetic overview, auroral forecast and the current solar wind conditions, including the solar wind speed and BZ (for more information, see previous section about the solar wind) but also the X-ray flux, which indicates flare activity. Although flares with lower fluxes do occur, an X-ray flux above 10^-6 is considered a common flare (C class), 10^-5 a moderate one (M class), and 10^-4 extreme (X class).
Gallery
At the bottom of this page you can find a collection of photographs taken with different types of cameras, and a description of when, where and with what settings the photos were taken (for a larger version, click on the images).One should remember that the photos you see of the aurora only give you a glimpse of the reality. The spectacular photos you most often see are usually manipulated, at least to enhance the colours. This does not mean, however, that reality would pale in comparison! Seeing live even the “less spectacular” aurora is a magical experience and very different than seeing a static image.
Tips on photographing the aurora
There are many elements that affect how well your northern lights photos turn out, but here are a few simple tips on where to start:
Tripod is your friend! Since you will usually need long exposure times, this means that taking photos of the aurora without a stable position gets tricky very quickly. You should also use a self-timer or remote trigger to prevent any extra movement.
Change to manual settings
Flash: off
Exposure time: 10-30 s depending on, for example, how strong the northern lights are. The brighter the lights, the shorter exposure time you can use.
f-stop: as large as possible (lowest number)
ISO: 800-1600
Manual focus to infinity
Smartphones
The tips above are also a good starting point for smartphone cameras. While it can be a bit tricky, one can still capture some memories of the aurora even with a smartphone. Particularly with the modern phones one can already achieve quite decent photos. Here are a few examples:

ISO 800. Taken in Tromsø.


Most importantly: don’t spend all your time looking through the camera lense, but remember to take a moment to enjoy the real thing also!
Gallery

Processed with Lightroom.


Processed with Lightroom.


Forecasts
Forecast locations
Global
Svalbard
Tromsø
Trondheim
Bergen
Oslo